Photoshop actions are a useful tool for photographers who need to streamline part of their production workflow. Many photographs have seen it fit to attempt to sell these very simple pieces of data in the disguise that they are some how extraordinary. In fact all over the internet there are “Action packs” that do nothing more then replay out a set of adjustments that were recorded from within photoshop. This does nothing to enhance the education of photographers. My aim is to provide an alternative to this by explaining how some of the most common and useful actions are created.
Water-marking.
Personally I don’t care for watermarking. However a lot of photographers depend on them to prevent the theft of licensed images. I am going to talk you through the steps and explain why they are used the way they are.
When you run an action either manually or as part of Photoshop’s batch command, the image is either already opened or opened automatically, so we do not need to worry about including any open commands in the action. For this tutorial, I am going to be using the image below.
I recommend working through this tutorial as a test run to begin with so that you can explore the functions. Once you are ready to create the action, make sure that it is recording from the ‘Actions’ window..
For this tutorial, I am assuming that you are running full resolution images through the batch action processor, so I am going to include the steps for resizing images. If you usually will be working with images that are already sized for web, skip over these steps.
If we were to use the ‘Image Size’ function, we would be limited in the aspect ratios of the images we put through the action. For example, if I were to create the action while working on a landscape orientation, it would then distort a portrait orientated image into a landscape. For this reason, we are going to use the ‘Fit Image’ function. You can find it in the menu system as follows;
File > Automate > Fit Image
Fill out the fit image window to suite your requirements. I have mine set to resize the images to fit within a boundary of 980px by 980px. A landscape will be at a maximum of 980 pixels wide and the portrait will be 980 pixels high, however they will still maintain their correct aspect ratio.
Now we need to ensure that the resolution of the image is suitable for the web. This would not usually matter, however in the following steps we will be using functions which do depend on this. Go to;
Image > Image Size
Set the resolution to 72 pixels/inch and make sure that the ‘Resample Image’ option is unchecked.
It is now time to add the watermark to the picture. For this we will use the place function located;
File > Place…
The Place function will add the watermark to the dead centre of the image. You should have already created a watermark you want to add to each image. Here is mine;
Make sure you save your watermark with a transparent background if required and with the resolution set to 72 Pixels/Inch.
It is vital that before you click the Tick button after placing the image, make sure the W(width) and H(height) settings are both set to 100%.
It is now time to choose where in the frame that you want to place the watermark. Unfortunately the most logical method of doing it, which is to just drag it over to one of the corners you would like, will not work. This is because everything recorded in an action has a relative setting, not an absolute one. So instead of moving the image to the bottom-left corner, instead it would be moving it a certain distance to the left, and a certain distance down. This would always be the same, no matter what the shape of the image is. Luckily for us, there is a way around this using absolutes.
First, select the entire frame using the menu command;
Select > All
This has let photoshop know the boundary of where we will use the next commands. Select the Move Tool (usually at the top of the tool palette). As with any tool in photoshop, we will be given a contextual tool bar at the top. It is these buttons circled in red that we are now interested in.
These tools will move the contents of the current layer relative to the boundaries of our current selection. Since we have selected the entire canvas, if we press the button that shows the content against the left wall, it will move the contents all the way to the left of our canvas. If we then press the button that moves the content to the bottom wall, it will then find itself in the bottom-left corner. (This is a very useful tool)
At this stage we have the watermark in the corner we would like, however it will be pushed right up to the edge of the canvas and not looking overly attractive. It is at this point that we can nudge the watermark away from the edge of the canvas and that relative movement will be retained in the action.
Now all you have to do is flatten the image so that the action can save it without any problems with layers;
Layer > Flatten Image
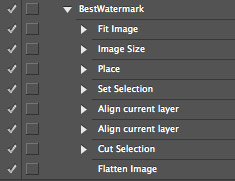
Done! Don’t forget to hit the stop button on recording your action. Here is what the final action looks like and the end product.


